HiByUSBMaster User Guide
HiByUSBMaster for Windows is used to connect compatible USB audio devices, adjust PEQ sound effects, configure device features, and sync song information and cover art provided by computer music players to the device.
Features supported may vary by device. Please refer to the options displayed after connection and the device instructions.
1 Before Use
- Computer: Media data features are used on Windows 10 or Windows 11.
- External device: A USB audio device that supports the corresponding control features of HiByUSBMaster.
- Cable: A cable that supports USB data transfer, not charging only.
- Music player: For media sync, use a player that can provide media information to Windows.
The software does not provide a built-in music library. Whether song, artist, album, cover art, and progress are complete depends on the information provided by the music player and the device's supported range.
Before adjusting sound effects, lower the volume and back up important PEQ configurations first.
2 First Use
- Run the HiByUSBMaster installer and complete installation as prompted.
- Connect the device to the computer using a USB data cable.
- Open HiByUSBMaster and confirm or select the target device in the "Device List" at the top.
- To adjust sound, go to the "PEQ" page and click "Load Device PEQ" first to read the device configuration.
- To sync song information, play a song in the music player, then go to the "Media Data" page to check.
- To adjust device features, go to the "Device Settings" page and operate according to the options provided by the device.
Connecting and controlling the device and selecting music output are two different things. To play sound through the device, you also need to select the corresponding audio output device in Windows or the music player.
3 Main Interface
The top of the window provides device selection, firmware query, device restart, and language switching. The three tabs below switch functions.
| Entry | Purpose |
|---|---|
| Device List | Select the device to control; when multiple devices are connected, verify the device name first. |
| Firmware Version | Query the firmware version of the selected device. |
| Restart Device | Restart the device after confirmation; connection and music playback may be temporarily interrupted. |
| Language Selection | Switch between Simplified Chinese, Traditional Chinese, or English. |
| PEQ | Adjust equalizer parameters, save and import configurations. |
| Device Settings | Adjust device-supported features such as power, lighting, and display. |
| Media Data | View computer media information and device sync status. |
4 PEQ Sound Settings
The upper part of the PEQ page shows the frequency response curve and common buttons; the lower part is the parameter adjustment area for each band.
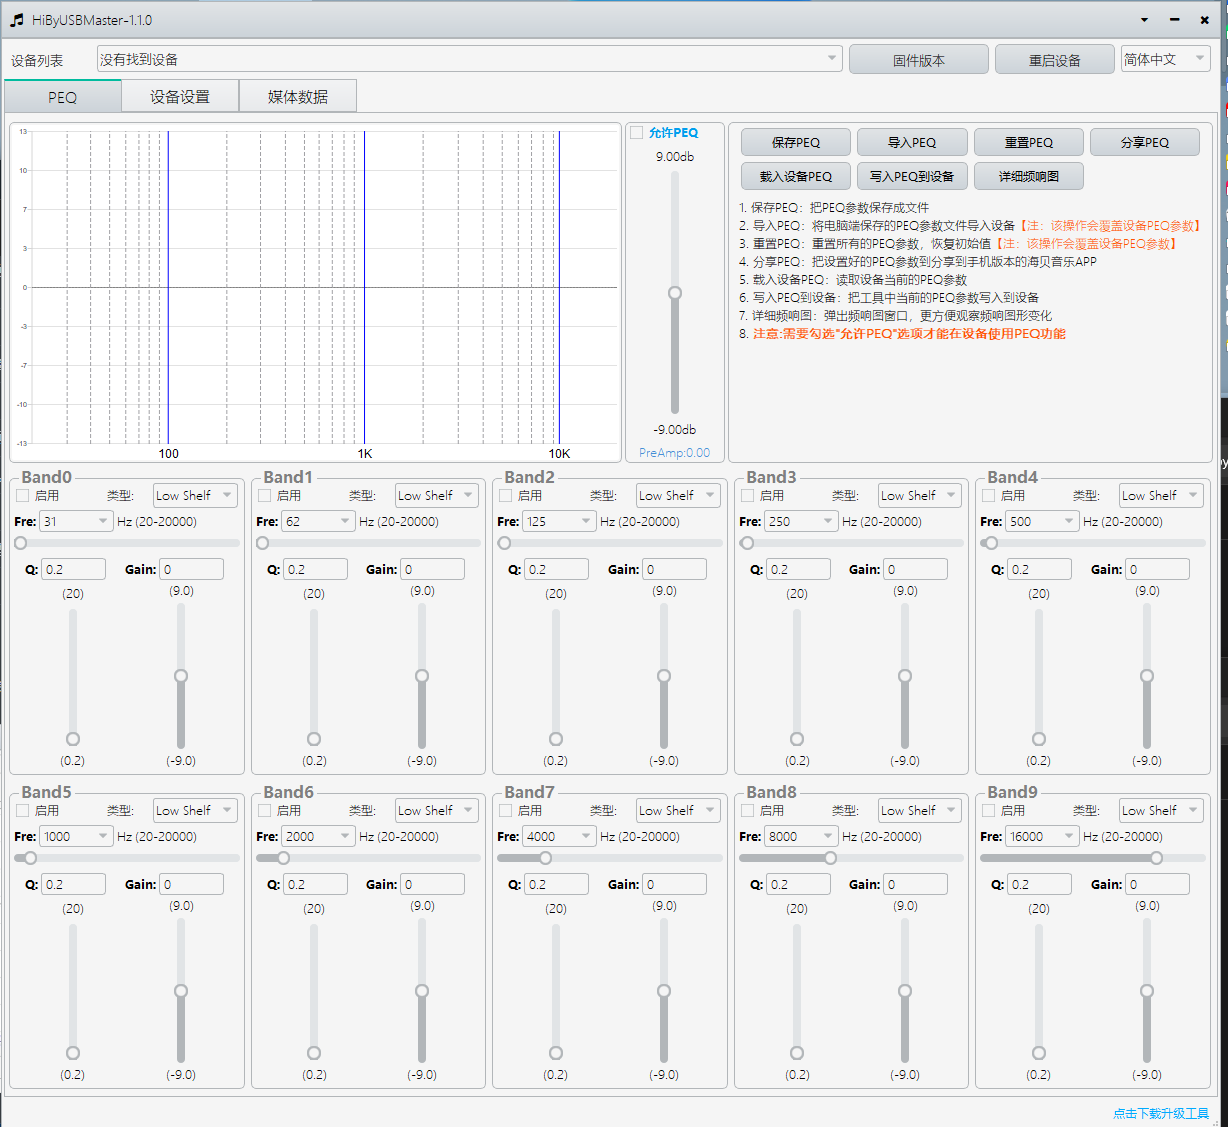
Figure 1 PEQ feature entry.
4.1 Load Device PEQ
- Select the target device in the device list.
- Click "Load Device PEQ".
- Read the prompt and confirm, then wait for the reading result.
- Check the bands, gain, and other parameters on the page before starting adjustments.
Loading will overwrite the current configuration on the page. If there are settings on the page that need to be kept, save them first. If the reading prompt indicates a partial failure, successfully read items and items retaining original values may coexist. Please check according to the result prompt and do not treat the page as a complete device backup at this time.
Figure 2 Load Device PEQ.
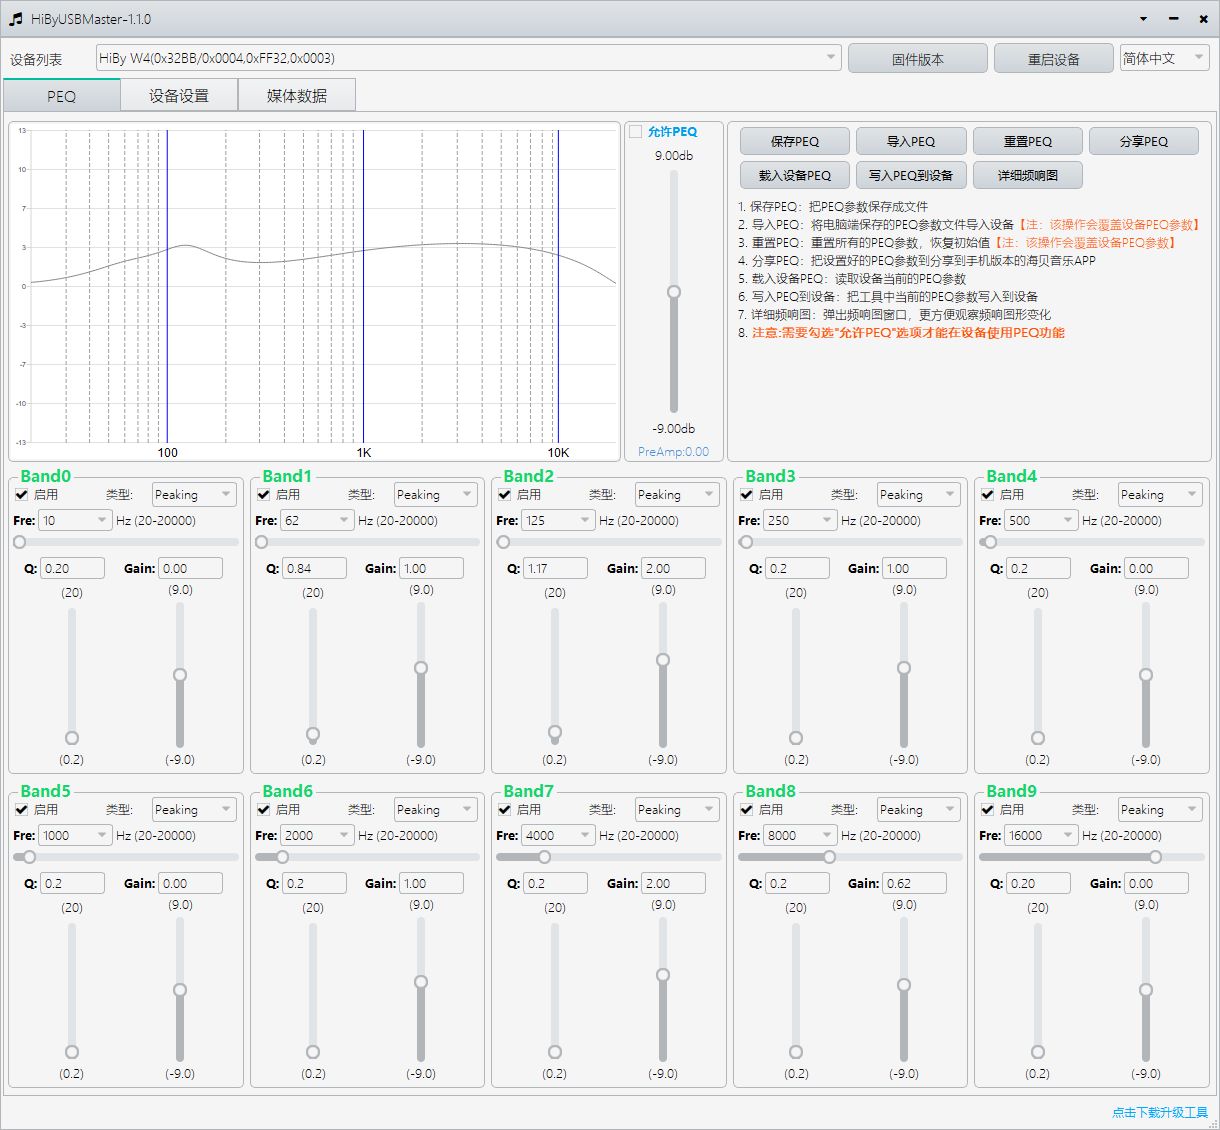
Figure 3 Loaded band parameters and frequency response curve.
4.2 Adjust Bands and Preamp Gain
- Check "Enable PEQ" to enable the overall PEQ function.
- Check "Enable" in the Band to be adjusted.
- Select the filter type and adjust frequency, Q value, and gain.
- Observe the frequency response curve and listen at a lower volume.
- To write the entire configuration in batches, follow "4.3 Write PEQ to Device".
| Parameter | Meaning |
|---|---|
| Enable PEQ | Controls whether the overall PEQ is enabled. |
| Band Enable | Controls whether the band participates in tuning. |
| Type | Select the filter method, such as Low Shelf, High Shelf, etc.; refer to the list. |
| Fre | The frequency affected by the band, in Hz. |
| Q | Adjusts the range of effect. For peak-type filters, generally the larger the Q, the narrower the affected range. |
| Gain | The boost or attenuation of the band, in dB. Positive values boost, negative values attenuate. |
| PreAmp | Overall preamp gain. When boosting multiple bands, you can appropriately lower it to leave headroom for the signal. |
Parameters can be adjusted via input boxes, sliders, and drop-down lists; the available range is subject to the interface.
After connecting the device, parameter changes may directly affect the device. Do not treat the page as a completely offline editor. Before importing, resetting, or writing the entire set, it is recommended to save a backup first.
4.3 Write PEQ to Device
- Select the target device in the device list.
- Click "Write PEQ to Device".
- Read the prompt and confirm to write the entire PEQ configuration on the current page to the device.
- Wait for writing to finish and check the result prompt.
This operation is suitable for applying a prepared entire PEQ configuration to the device. To adjust individual parameters while listening, follow "4.2 Adjust Bands and Preamp Gain".
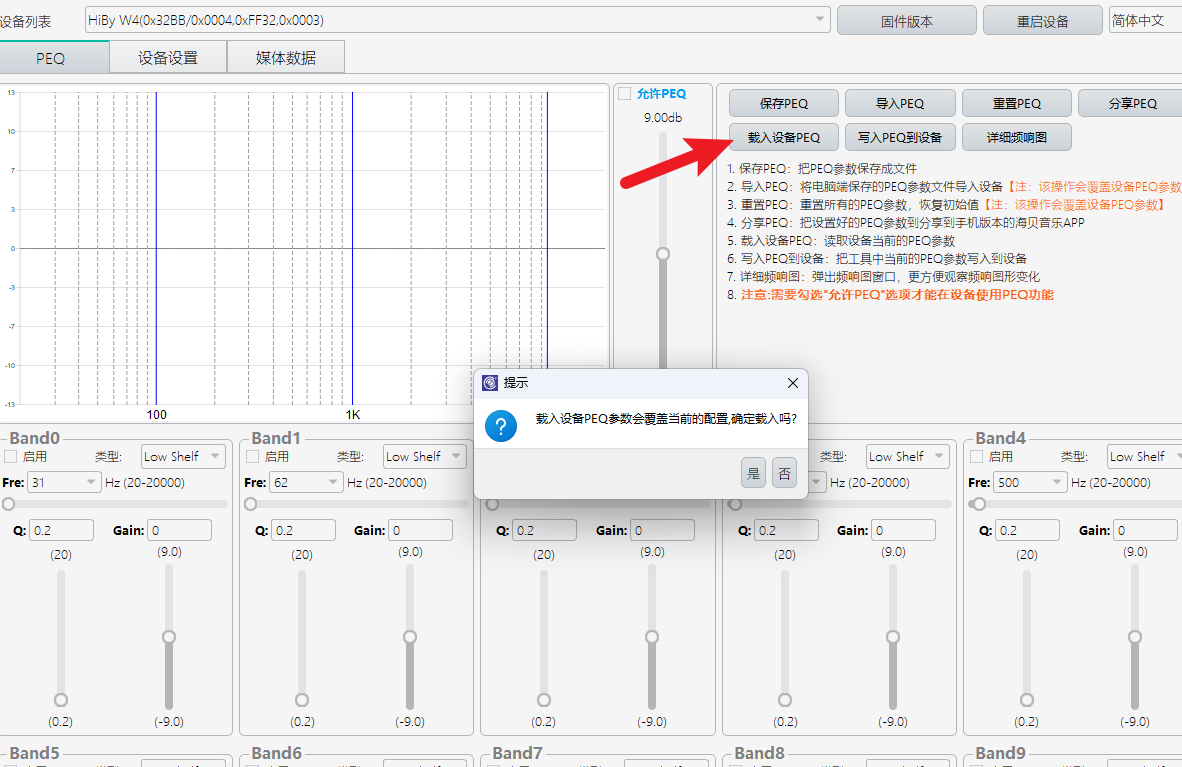
Figure 4 Write PEQ to device.
4.4 View Frequency Response Curve
The curve changes with the current page configuration and is used to preview the PEQ adjustment trend. Click "Detailed Frequency Response Graph" to open a chart that is easier to observe.
The curve is not an actual sound measurement result, nor does it mean the device has successfully received the parameters. Whether writing is complete should be based on the operation result prompt.
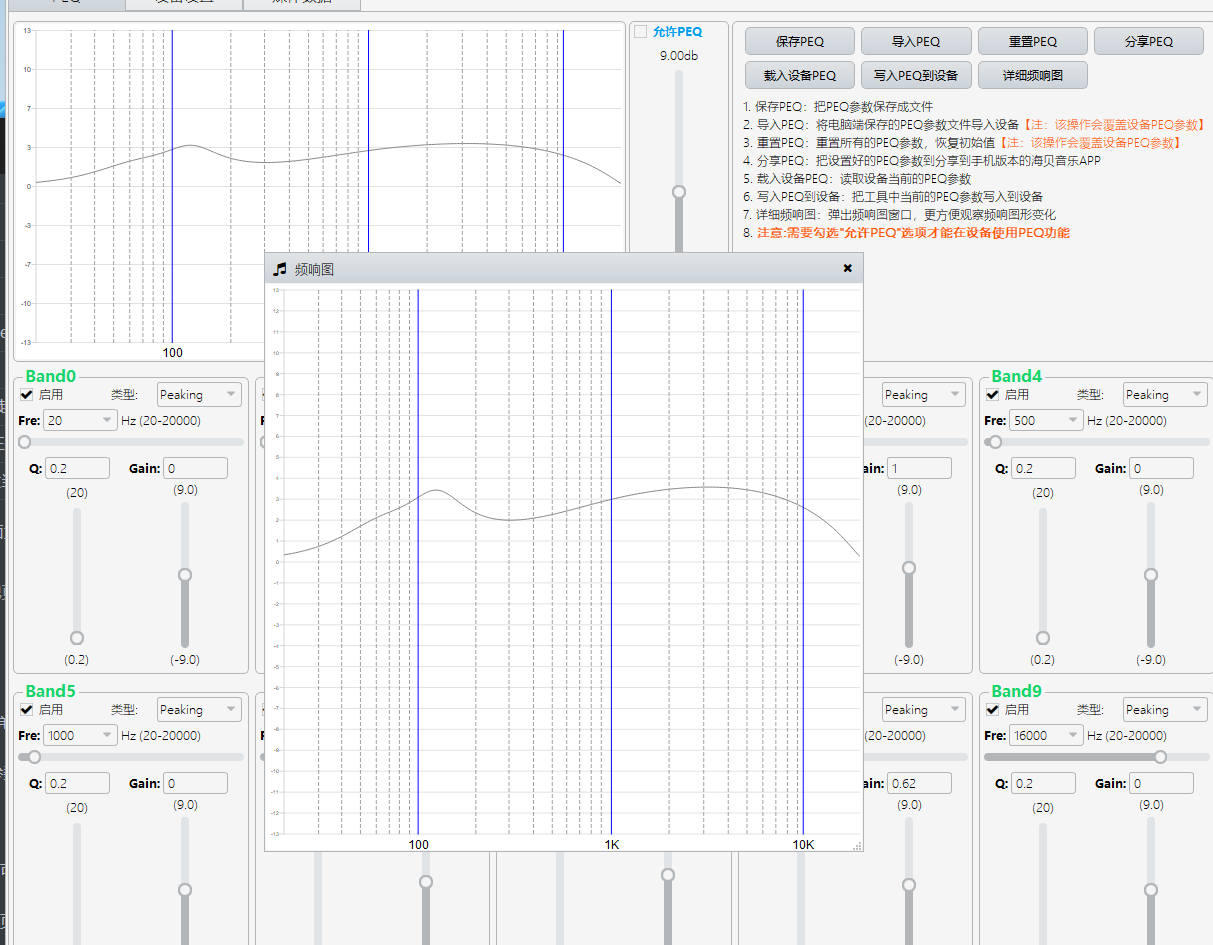
Figure 5 Detailed frequency response graph.
4.5 Reset PEQ
Click "Reset PEQ", read the prompt and confirm to restore the PEQ configuration to default parameters. When connected to the device, the reset parameters will be written to the device and overwrite the device's original PEQ configuration. Please save the settings you need to keep first.
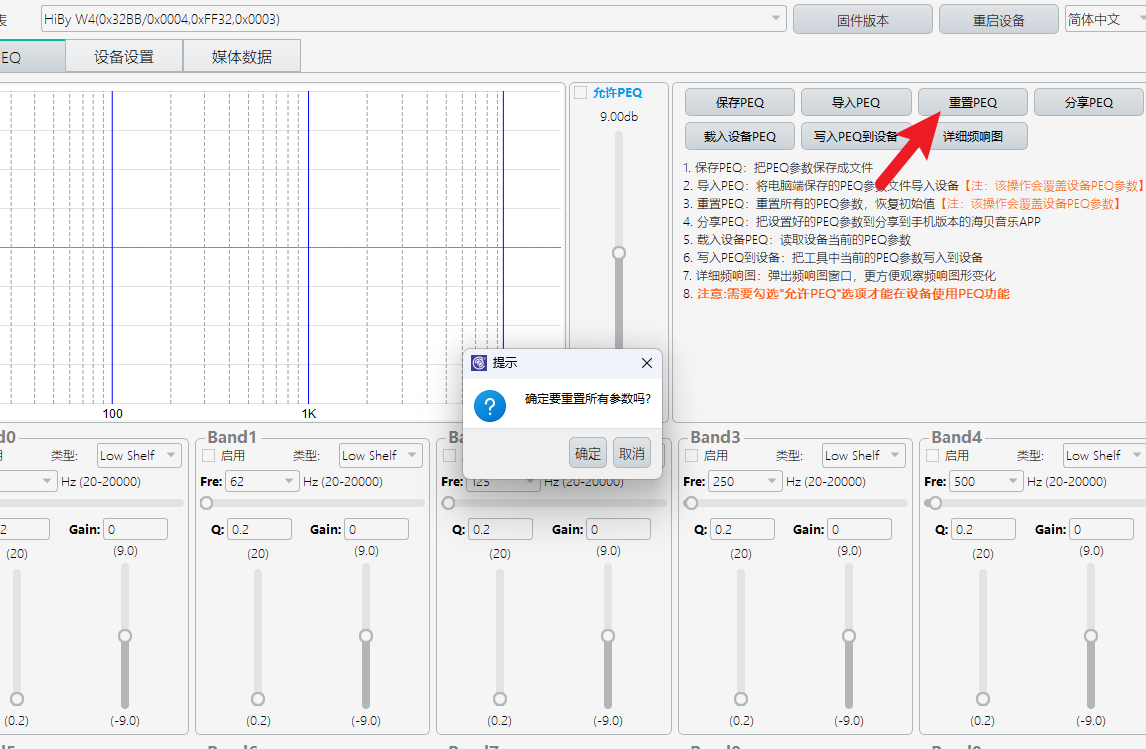
Figure 6 Reset PEQ.
4.6 Save, Import, and Share PEQ
Save configuration: Click "Save PEQ", fill in the information in the pop-up window, and save. Later, you can select the saved .peq file via "Import PEQ" to restore the configuration.
Import configuration: Click "Import PEQ" and select the required file. Importing will replace the page configuration and may update device parameters. Please confirm that the file is suitable for the current device first.
Share PEQ: Generate a sharing QR code, which can be used by the HiBy Music App that supports the corresponding import method.
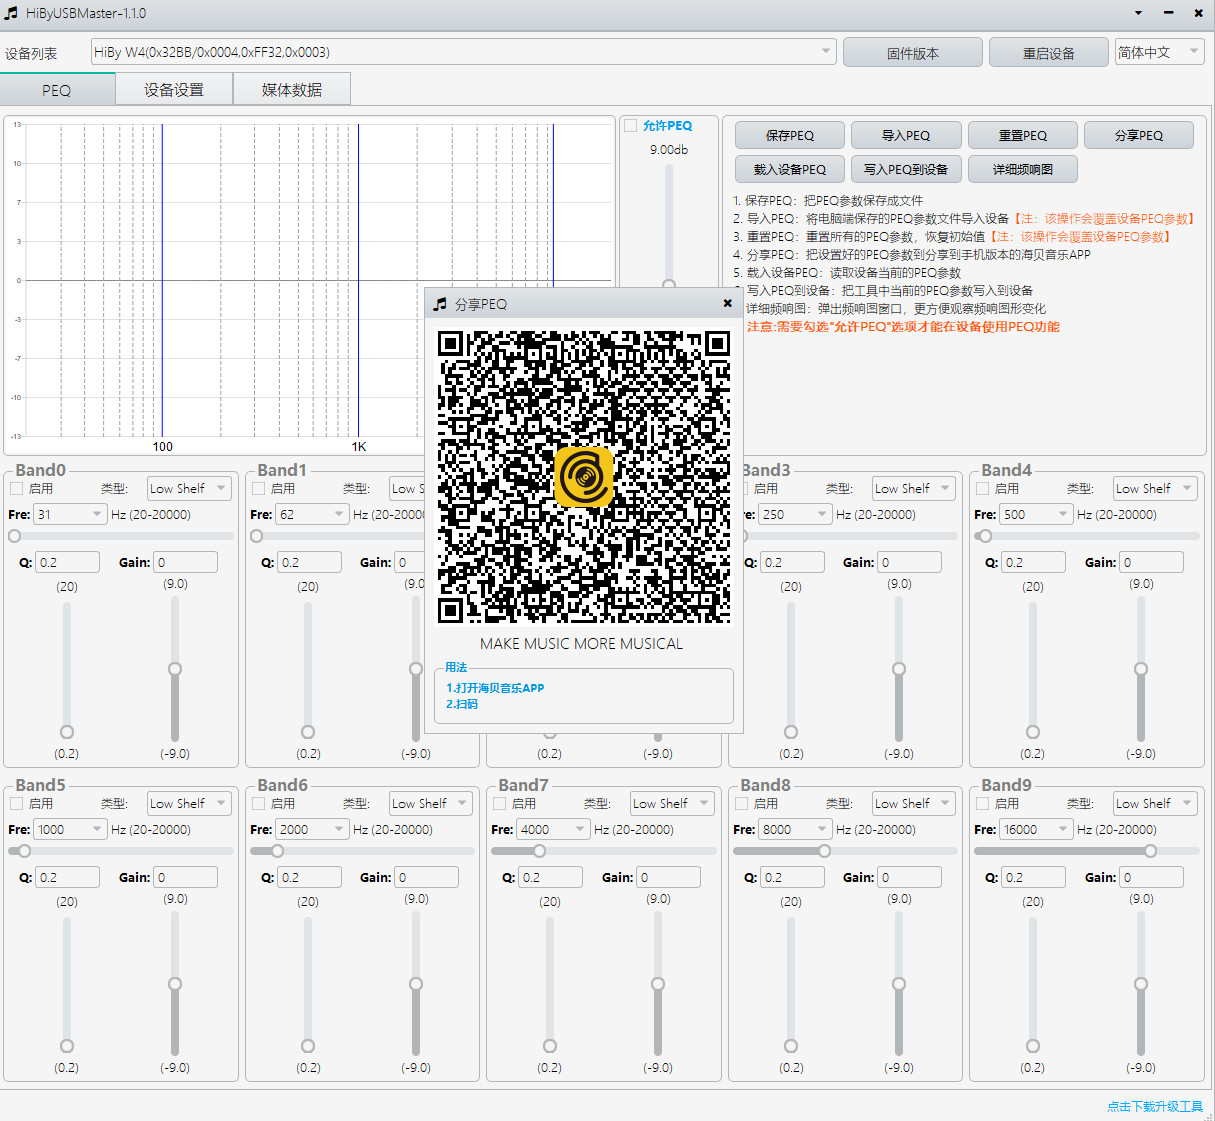
Figure 7 Share PEQ.
5 Device Settings
"Device Settings" is used to adjust the connected device's power supply policy, lighting and screen display, MQA Render, and playback display interface.
Connect the device first, select the device to be set in the top device list, and then enter the "Device Settings" page. The software will read the device's current settings and only display settings supported by the device; if there are no available items, it will display "The device does not support this feature". Items displayed may vary by model.
After clicking a mode option or toggling a switch, the setting will be sent directly to the current device; there is no need to click "Write PEQ to Device". Keep the USB connection during setting, and confirm the device name at the top before switching devices.
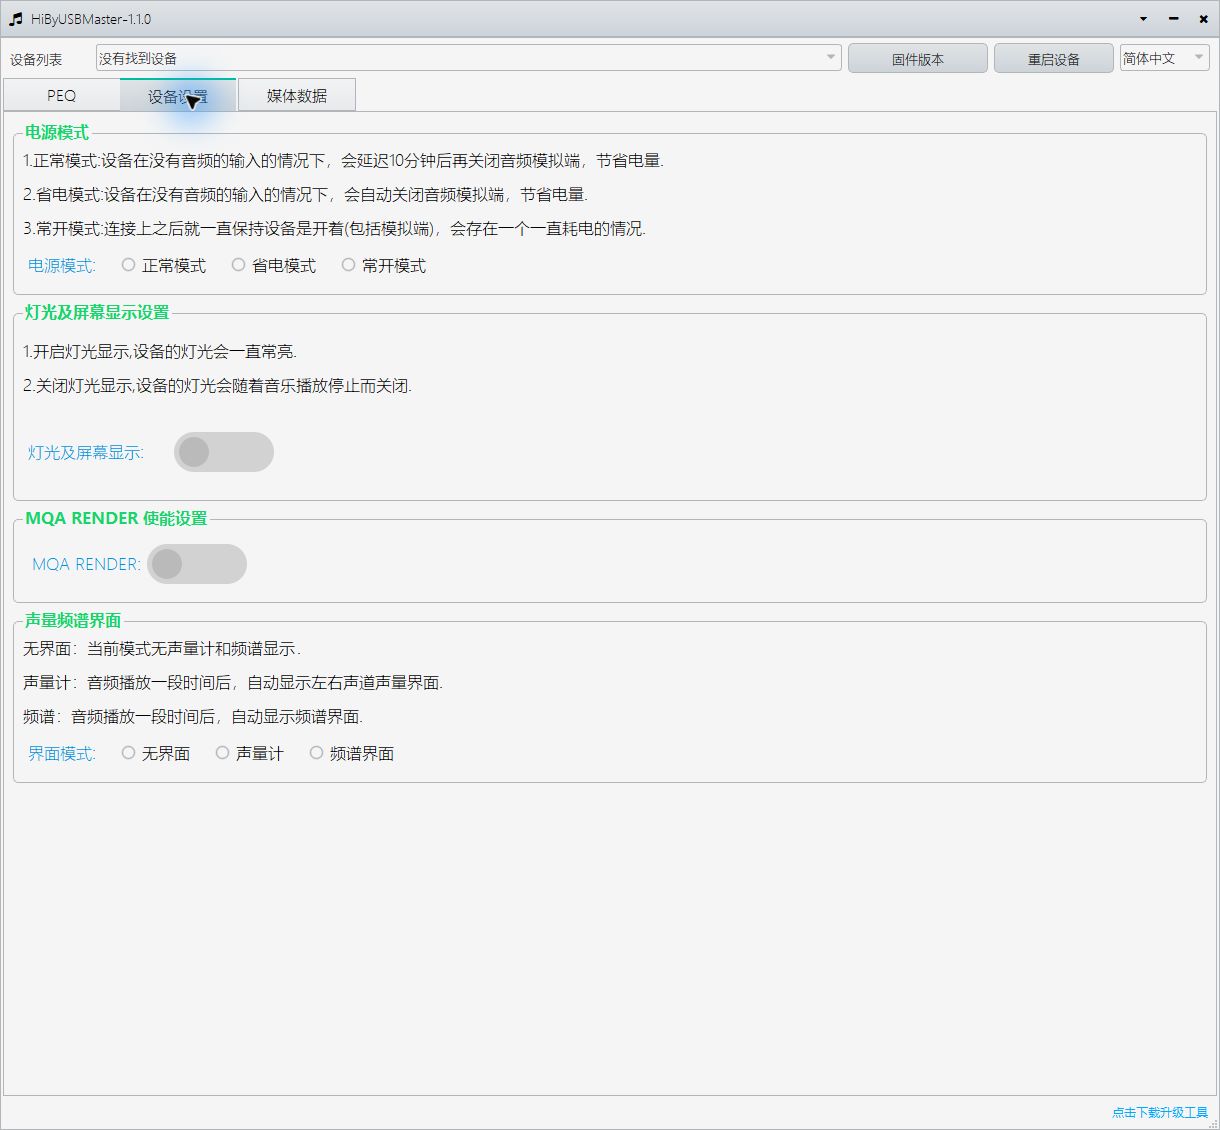
Figure 8 Device settings page.
5.1 Power Mode
Power mode determines whether the device continues to keep the audio analog section on when there is no audio input. You can choose according to daily usage habits.
| Mode | Function Description | Usage Suggestion |
|---|---|---|
| Normal Mode | After no audio input, turn off the audio analog section after a 10-minute delay to reduce power consumption. | Suitable for daily playback and short pauses. |
| Power-Saving Mode | When there is no audio input, automatically turn off the audio analog section to reduce power consumption. | Suitable for scenarios that prioritize energy saving. |
| Always-On Mode | Keep the device and audio analog section on continuously after connection. | Suitable for scenarios where you want the analog section to work continuously, but it will continue to consume power. |
Click the desired mode to switch; only one mode can be selected at a time. Power saving here is control of the audio analog section and does not mean disconnecting USB or closing the computer software. For specific standby delay and wake-up behavior when resuming playback, refer to the device instructions and current firmware.
5.2 Lighting and Screen Display
This setting is used to control the device's lighting and screen display policy. Click the switch to toggle between on and off.
- On: The device light stays on.
- Off: The device light turns off when music stops playing; it does not mean all displays turn off immediately after clicking.
If the device is still playing music after turning off the switch, the light temporarily remaining on is how this setting works. You can stop playback and observe the change; different devices may have different control ranges for screens and indicator lights; please refer to actual device support.
5.3 MQA RENDER
MQA Render is used by devices that support this feature to process corresponding MQA audio. Click the "MQA RENDER" switch to turn it on or off; no PEQ parameter adjustment is required.
Turn on the switch when MQA Render is needed; turn it off when not needed. Whether it actually enters MQA playback status also depends on the music content, player output method, and device support. Turning on this switch will not convert ordinary music to MQA, nor does it mean all music will be played as MQA.
5.4 Volume/Spectrum Interface
This setting is used to select what is displayed on the device when playing music. Click the desired option to switch; only one option can be selected at a time.
| Option | Display Effect |
|---|---|
| No Interface | Do not display the volume meter or spectrum interface. |
| Volume Meter | After audio playback for a period of time, automatically display the left and right channel volume interface. |
| Spectrum Interface | After audio playback for a period of time, automatically display the spectrum interface. |
After selecting Volume Meter or Spectrum, play music and wait for the device to automatically enter the corresponding interface. These options only change the display mode on the device; they are not used to adjust volume and will not modify PEQ parameters or the frequency response graph on the computer.
6 Media Information Sync
Play a song in the music player, then enter the "Media Data" page to view the current song and device sync status.
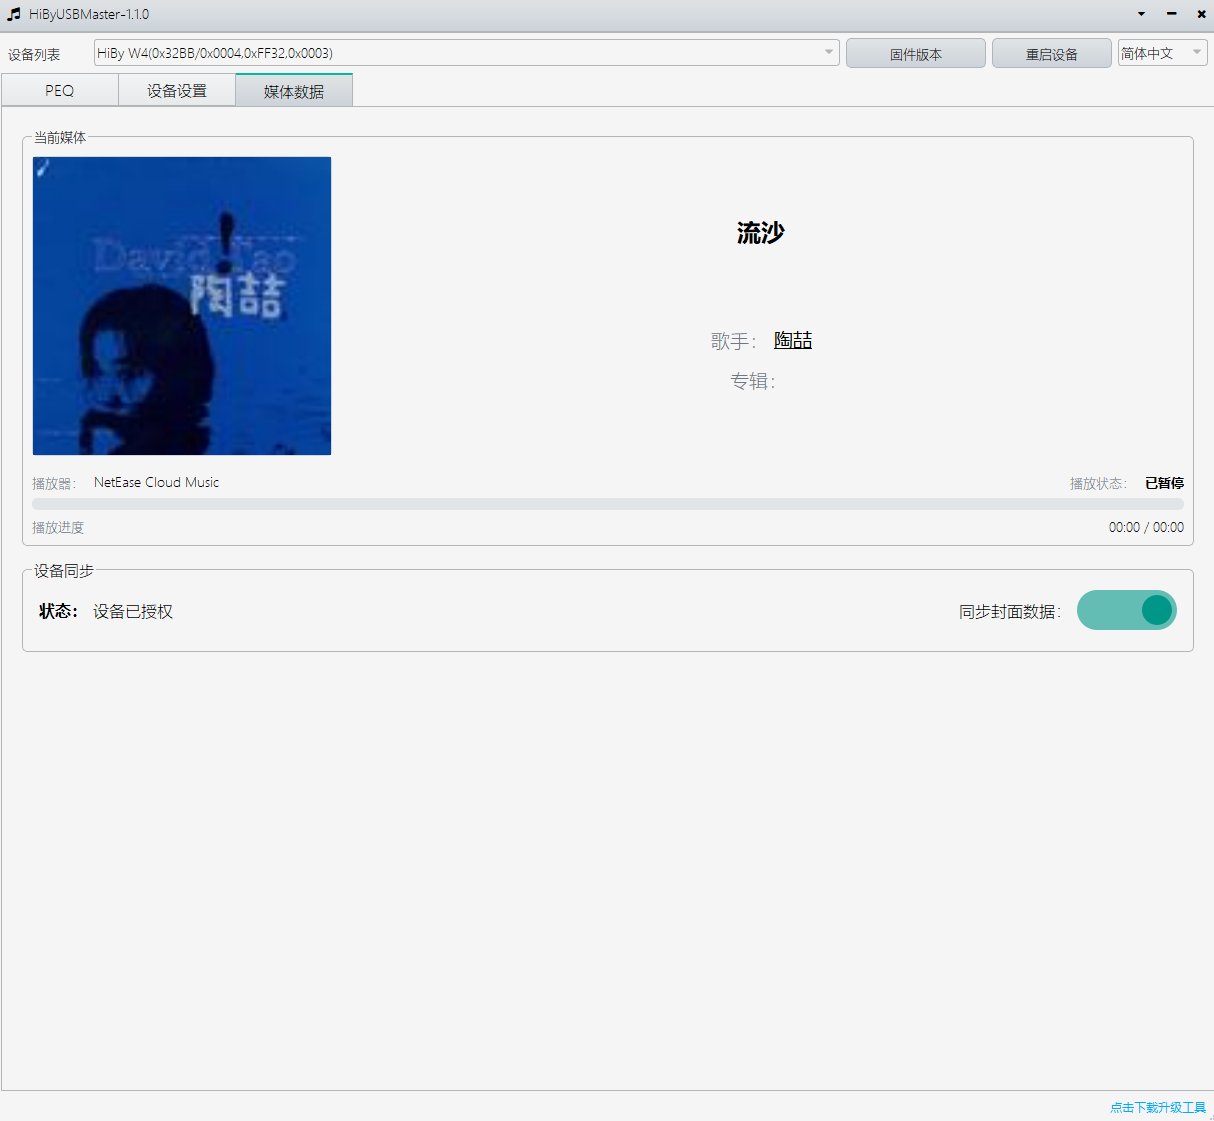
Figure 9 Media data page.
6.1 View Song and Playback Progress
| Content | Display Condition |
|---|---|
| Song, artist, album | The player provides the corresponding information. |
| Cover | The player provides a readable image; if no image is available, the default cover is used. |
| Playback status, position, and total duration | The player provides the corresponding status and time information. |
| Player name | Displays the source of the player currently providing media information. |
It is recommended to use only one music player at a time to avoid selecting information from another player. The fact that the music software itself can display cover art or progress does not mean it will necessarily provide this content to Windows.
6.2 Sync to Device
After connecting the device and passing feature authorization, the software will automatically sync the information supported by the device; there is no need to click send each time. Please check the status in the "Device Sync" area.
| Status | Handling Method |
|---|---|
| Device not connected | Connect the device and confirm the selection at the top. |
| The current device's HID protocol version is lower than 2.0 | Contact after-sales to confirm whether the device has firmware that supports media sync. |
| The device does not support cover data sync | The current device does not have the corresponding cover capability; whether other information can be synced depends on the device's supported range. |
| Device authorization failed | Reconnect and try again; if it continues to fail, contact after-sales. |
| Device authorized | Content supported by the device can be synced; missing player data will not be filled in out of nowhere. |
6.3 Sync Cover Data Switch
"Sync Cover Data" only controls cover art and does not affect the sync of other information such as song name, artist, album, and progress.
- It is enabled by default each time the software starts and does not save the last disabled state.
- Plugging/unplugging or switching devices will not automatically change the current switch selection.
- When disabled, stop the current media cover sync and send a default cover once to supported devices; the computer page still displays the cover provided by the player.
- When enabled again, re-sync the current cover.
- When switching songs or resuming playback after pause, the cover will be re-synced according to the current data.
The switch being on does not mean the device definitely supports receiving cover art. After switching songs, wait for sync to complete; when switching songs quickly in succession, the information of the final playing track shall prevail.
7 FAQ
7.1 Device Not Found
Check whether the USB cable supports data transfer, whether the device is correctly connected, and try changing the port. Wait for recognition after reconnecting and confirm in the top device list; reopen the software if necessary.
7.2 PEQ Read or Write Failure
Check whether the correct device is selected, keep the connection stable, and wait for the operation to finish. If reading partially fails, do not treat the page as a complete device backup; if writing fails, do not judge that the device has been updated based only on page parameters. If it fails repeatedly, reconnect and try again, and provide a screenshot of the prompt.
7.3 No Audible Change After Modifying Parameters
Check whether "Enable PEQ" and the corresponding Band are enabled, confirm that music is actually output to the current device, and check the write result. Listen at a lower volume; do not boost multiple bands significantly just to pursue an obvious change.
7.4 Cannot Obtain Song Information, or Cover, Album, and Progress Are Missing
First confirm that the player is playing and enable its "System Media Control" option (if any). Pause other players and try again, or switch to another song or player for comparison. The player name displaying normally does not mean it has provided all media information; when missing, the default cover, empty fields, or 0 duration may be displayed.
The following table shows the compatibility test results of HiByUSBMaster 1.1.0 (October 19, 2026 version), applicable only to the listed test environment; player updates, plug-ins, and setting changes may affect the results.
- NetEase Cloud Music 3.1.40.205461 can obtain some information, but in previous tests, after upgrading to 3.1.41, it could not obtain information.
- Winamp requires installation of the Windows System Media Control plug-in; restart the player after installation and try again.
| Player | Test Version | Test System | Obtainable Information | Unobtainable Information |
|---|---|---|---|---|
| QQ Music | 21.92 | Windows 10 / 11 | Song name, artist, album, playback status, playback time, playback progress, cover | None |
| foobar2000 | v2.24.3 | Windows 10 / 11 | Song name, artist, playback status, cover | Album, playback time, playback progress |
| Roon | 2.71 (build 1683) production | Windows 10 / 11 | Song name, artist, album, playback status, cover | Playback time, playback progress |
| NetEase Cloud Music | 3.1.40.205461 | Windows 10 / 11 | Song name, artist, playback status, cover | Album, playback time, playback progress |
| Qishui Music | 3.2.1 | Windows 10 / 11 | Song name, artist, playback status, playback time, playback progress, cover | Album |
| Kugou Music | 20.1.51.27967 | Windows 10 / 11 | Song name, artist, playback status, cover | Album, playback time, playback progress |
| Kuwo Music | 9.6.0.0 | Windows 10 / 11 | None | Song name, artist, album, playback status, playback time, playback progress, cover |
| Bodian Music | 1.1.70 | Windows 10 / 11 | None | Song name, artist, album, playback status, playback time, playback progress, cover |
| Apple Music | 1.6.4.90 (1.540.23041.0) | Windows 10 / 11 | Song name, artist, playback status, playback time, playback progress, cover | Album |
| Windows Media Player | 11.2512.10.0 | Windows 10 / 11 | Song name, artist, album, playback status, playback time, playback progress, cover | None |
| Sony Select Hi-Res | 1.16.0000 | Windows 10 / 11 | None | Song name, artist, album, playback status, playback time, playback progress, cover |
| Winamp (plug-in required) | 5.92.0 | Windows 10 / 11 | Song name, artist, playback status, cover | Album, playback time, playback progress |
| TIDAL | 2.43.2 | Windows 10 / 11 | Song name, artist, album, playback status, playback time, playback progress, cover | None |
| Spotify | 1.3.4.258.gc60b10b0946a | Windows 10 / 11 | Song name, artist, album, playback status, playback time, playback progress, cover | None |
| Energy Media Player | 1.0.0.374 | Windows 10 | Song name, playback status, playback time, playback progress, cover | Artist, album |
| Elisa | 22.04.1 | Windows 10 | None | Song name, artist, album, playback status, playback time, playback progress, cover |
| MusicBee | 3.6.9668 | Windows 10 | None | Song name, artist, album, playback status, playback time, playback progress, cover |
| AIMP | V4.60 build 2175 | Windows 10 | None | Song name, artist, album, playback status, playback time, playback progress, cover |
| Aurora Music | 2.19081.2 | Windows 10 | Song name, artist, album, playback status, playback time, playback progress, cover | None |
| Tomato Music | Not recorded | Windows 10 | Song name, artist, album, playback status | Playback time, playback progress, cover |
Items marked only as Windows 10 were not tested on Windows 11. "Unobtainable" does not mean that all versions of the player do not support it.
7.5 Computer Has Song Information but Device Does Not Update
Check the USB connection, top device selection, and "Device Sync" status. For cover art, also check the sync switch and wait for transmission to complete after switching songs. Normal display on the computer does not mean the device supports receiving all content.